4th Grade - Trimester #3 Major Project
The last challenge also came from a teacher at 'Iolani School...Kathy Warner, Lower School Science Teacher has been doing this project as part of her space unit in 3rd grade. Over the 4 years I worked at 'Iolani, she graciously asked me to assister her in helping to add more Maker Ed aspects to this project. The last year I worked with her, we had the students using rapid prototyping (3D printers, & laser cutters), Scratch programing, MakeyMakeys, simple circuits and green screen video. When the curriculum was bring developed here, I knew I had to use this project.
The first part of this unit was to have each student research something in space (planet, asteroid, galaxy, black hole, etc.) and create a poster using Google Slides. These posters would be presented to the class to show what each person had learned (I'll write up the poster project at a later time). It was also a spring board for Project SEV (Space Exploration Vehicle)


The classroom was set up with a hot glue table and we were ready to start.

Planning began...


The making started...


The first step of the building stage is coming to an end for some students.


Once the SEVs were done with step one, they were spray painted.

We then took a brake from the SEVs to make simple circuits with copper tape, batteries and LEDs. In doing so, we reviewed/taught the basic concepts of electricity.

Once the paint dried, students could put 1 or 2 "real" parts (those from old computer boards, tech equipment, etc.) on their creation.


Next we showed the students how the MakeyMakey worked and then let them experiment with them and with Scratch programming (which they had learned in computer class).


After that, they had to plan out and write a program for two parts of their SEV to be interactive with the computer, via the MakeyMakey. Their program had to explain what that part of their vehicle was for and also share about the place they were going to visit. Each interactive part would also put a visual on the computer screen and have a audio component.
Finally, the SEVs were displayed in the library hall, along with their posters. If the students had finished their Scratch Program, they hooked them up to the MakeyMakey and displayed them.


The first part of this unit was to have each student research something in space (planet, asteroid, galaxy, black hole, etc.) and create a poster using Google Slides. These posters would be presented to the class to show what each person had learned (I'll write up the poster project at a later time). It was also a spring board for Project SEV (Space Exploration Vehicle)
#3
Design challenge: Imagine, plan and make an SEV that will visit the place the student researched.
Materials: Recyclables collected over the school year, pieces of old computer boards, hot glue guns.
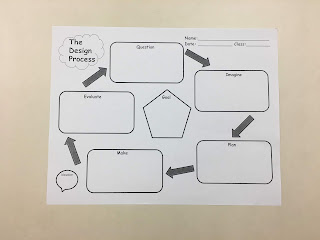
Process: Students were to go through the design process again. They first filled out a plan sheet with certain criteria. When it was approved by the teacher, they had to draw a labeled blueprint of their SEV. Once that was approved, they began creating.
To help give them some idea what a "real" SEV might look like, we used the app Spacecraft 3D from NASA's Jet Propulsion Lab (thanks to Mike Fricano @EdTechnology for sharing this with me last year). This app allows students to look at various spacecraft in augmented reality.

Recyclables were collected from the 4th graders over the first part of the year. They didn't know why, just that there were certain things we needed...old pill bottles, small sport drink bottles, small shampoo bottles, plastic cartons, old pens, twist ties, Costco apple packages, Starbucks green lid "stirrers/caps", toothpaste caps, etc.


The classroom was set up with a hot glue table and we were ready to start.

Planning began...


The making started...


The SEVs are starting to take shape...


The first step of the building stage is coming to an end for some students.


Once the SEVs were done with step one, they were spray painted.

We then took a brake from the SEVs to make simple circuits with copper tape, batteries and LEDs. In doing so, we reviewed/taught the basic concepts of electricity.

Once the paint dried, students could put 1 or 2 "real" parts (those from old computer boards, tech equipment, etc.) on their creation.


Next we showed the students how the MakeyMakey worked and then let them experiment with them and with Scratch programming (which they had learned in computer class).


After that, they had to plan out and write a program for two parts of their SEV to be interactive with the computer, via the MakeyMakey. Their program had to explain what that part of their vehicle was for and also share about the place they were going to visit. Each interactive part would also put a visual on the computer screen and have a audio component.
Finally, the SEVs were displayed in the library hall, along with their posters. If the students had finished their Scratch Program, they hooked them up to the MakeyMakey and displayed them.


Very well done.
ReplyDelete